Easter is only a few days away!
...I didn't even realize...
& I know, just like many others, I'm in a scramble to prepare.
So here are a few quick (& ChEEp) Ways to Easter up your day!
Easter Egg Tree
Just grab a some branches from your yard and pop them into any vase, bucket, or other container. You’ll need to use hand-blown eggs, but before you get too scared, let me assure you that these are really not hard to make (but they do take a little time).
Here’s how to do it:
- Dye your raw eggs first.
- Gently poke a hole in the top and bottom of the egg with a needle.
- Use the needle to gently make one hole a little larger.
- Push the needle into the egg to pierce the yolk.
- Use a straw to blow everything out of the larger hole. You may need to adjust the size if you’re having trouble.
- Rinse the eggs as best you can a few times and dry the outside.
- Thread a narrow 1/8-inch ribbon through the eggshell, using a quilting needle.
- Thread a bead on the bottom end of the ribbon, leaving a 3/4-inch tail, and then secure with a knot. The bead will anchor the ribbon and prevent it from slipping through the hole.
- Tie each ribbon and hang on the branches.
I love the simplicity here. So Dainty & Elegant.
Bunny Fold Napkins
With a few easy folds, you can turn your napkins into a cute bunny to welcome each person to the dinner table. People will be so impressed and appreciate the extra attention to detail you took to create a special table. Here is the play by play via Good Housekeeping. After you do one, you’ll be a pro.
Here’s how to do it:
Step 1
Take a solid-colored square napkin, and starch it for optimal workability. Thinner napkins work better, so choose a linen napkin over a thick cotton one.
Step 2
Fold the napkin in half.
Step 3
Fold the napkin in half again, to form a long rectangle.
Step 4
Fold the right and left sides up to meet in the center, forming a point at one end.
Step 5
Repeat with the opposite corners.
Step 6
Fold the side corners in so they meet in the center, but don’t fold exactly straight. Pull up above the center point, and you’ll start to see the ears shape up. The napkin will form a kite shape.
Step 7
Gently turn your napkin over.
Step 8
Fold the bottom point up, so that it is roughly 1” above the center of the napkin.
Step 9
Carefully, turn the napkin over again.
Step 10
Roll the left side over, slightly past the center of the napkin.
Step 11
Fold the right side over, tucking the end into the pocket you created on the left side, holding your napkin together.
Step 12
Turn the napkin upright, separating the bottom to form a base. Fluff your bunny’s ears.
I thought these were just TO cute to pass up!
Decorated Egg Weights
Don't let your tablecloth blow away. Anchor your party table covering with plastic eggs filled with jelly beans. Secure gingham ribbon around the eggs with hot glue, and thread through openings you've hole-punched into the corners of the cloth.
Daffodil Candy Cups
Trace Daffodil shape onto decorative paper; cut out. Fill baking cups with candy, and place onto flowers. If desired, join cups to flowers with tape.
Easter Candy Parade
Fill glass jars with colorful layers of bulk candy for quick and festive centerpieces. Or, create an Easter basket effect by nestling a white-chocolate bunny or lamb in green paper "grass." Finish with ribbon and a tag, or attach a note to the lid using double-sided tape.
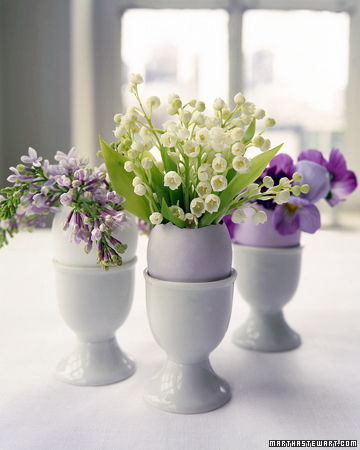
Egg Shell Flower Arrangements
Make your Easter table bloom with tiny flower arrangements inside hollowed-out eggshells. Break an egg at the top of its shell, drain the contents, and carefully rinse out the inside. Next, fill the empty shell with room-temperature water and place it in an eggcup for stability. Finally, insert small cuttings of your favorite blossoms
OR
Paper Basket Bouquets
Try a twist on Easter baskets, and make a paper basket bouquet for every place setting. All you need are small brown paper bags, baby-food jars or shot glasses, and your favorite blooms.
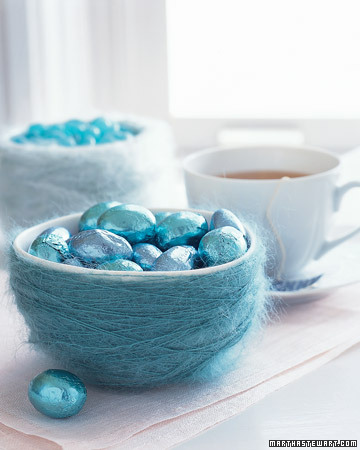
Candy Nests
Disguise candy bowls as fuzzy birds' nests for your Easter gathering with this simple idea. Cover the outside of a bowl with double-sided tape and wind a ball of yarn (like mohair) around the bowl until its exterior is hidden. To finish, securely tuck the loose end behind the wrapped yarn.
Egg Garland
Here’s how to do it:
1. With an egg blower (available at crafts stores), poke a small hole at top and bottom of each egg -- be sure that the pin pierces the yolk; carefully expel contents. Rinse, let dry, and then dye with food coloring.
2. Thread one end of seam binding through beading needle. Use to draw ribbon through egg holes. Knot ribbon to secure first and last eggs, and snip. Hang garland in swags over hooks affixed to wall or molding. Place bows so they conceal hooks.
Cover work area with old newspaper to catch drips. Use cups or bowls as deep as an upright egg, so you can completely submerge the shells.
To prepare dyes, use 1 teaspoon of vinegar and about 20 drops of food coloring for each 1/2 cup of boiling water. Experiment with various shades in different bowls; a couple of blue drops added to a red dye, for example, will yield a raspberry color.
Vary dipping times to create different intensities of a single color. Shells absorb dye at different rates: Dipping for less than 5 minutes will produce subtle, translucent hues. To deepen color, leave egg in dye bath for at least 10 minutes.
I hope that helps all of you as much as it did me!
How are YOU decorating this year??
Don't forget to check out the newest features!
